
kenmore self cleaning oven manual
Finding Your Kenmore Oven Manual
Need to find your Kenmore oven manual? You can usually find it by entering the model number on the Kenmore website. These manuals provide important information about operation and care.
Using the Model Number to Locate the Correct Manual
To locate the correct manual for your Kenmore oven, you will need the model number. This number is usually found on a sticker or plate on the oven itself. Common locations include inside the oven door, on the side panel, or at the back of the appliance.
Once you have the model number, visit the Kenmore website and enter it into the search bar. This should direct you to a page where you can download the owner’s manual in PDF format. These manuals contain valuable information about your oven.
The manual will provide specific instructions for operating the self-cleaning feature and other functions of your Kenmore oven. This ensures you use it safely and efficiently. By following these steps, you can easily find the correct manual for your Kenmore oven.
Preparing Your Kenmore Oven for Self-Cleaning
Before initiating the self-cleaning cycle on your Kenmore oven, make sure to prepare it. This involves removing racks, accessories, and wiping away loose debris for optimal cleaning.
Removing Oven Racks and Accessories
Before starting the self-cleaning cycle on your Kenmore oven, it’s essential to remove all the oven racks and accessories. This step is crucial for several reasons. Firstly, the high temperatures reached during the self-cleaning process can damage the racks, causing them to warp or discolor. Secondly, any accessories left inside the oven, such as baking stones, broiler pans, or temperature probes, could also be damaged by the extreme heat.
Removing these items also ensures a more thorough cleaning of the oven interior. With the racks and accessories out of the way, the self-cleaning cycle can effectively reach all surfaces, eliminating baked-on food and grease. Make sure to check your oven manual for specific instructions regarding which items to remove, as some models may have unique requirements. After removing the racks and accessories, set them aside to cool completely before cleaning them separately, if necessary. This simple step will protect your oven and its components while ensuring a more efficient and effective self-cleaning process.
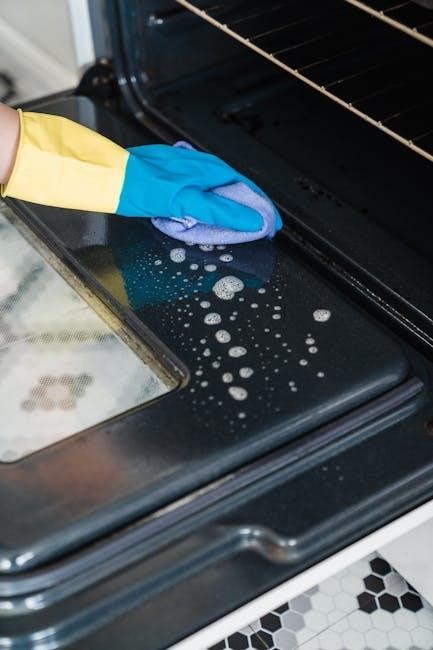
Wiping Up Loose Debris and Spills
Prior to initiating the self-cleaning cycle on your Kenmore oven, taking a moment to wipe up any loose debris and spills is a crucial preparatory step. Neglecting this step can lead to unwanted outcomes during the cleaning process.
Loose food particles, grease splatters, and accumulated debris can harden and become more difficult to remove when subjected to the high temperatures of the self-clean cycle. Additionally, burning debris can produce unpleasant odors and potentially create smoke, affecting the air quality in your kitchen.
To properly prepare your oven, use a damp cloth or sponge to carefully wipe away any visible food particles, spills, or grease from the oven’s interior surfaces, including the walls, floor, and door. Pay special attention to areas with heavy buildup. Removing this loose material beforehand will ensure a more effective and cleaner self-cleaning cycle, minimizing the risk of lingering odors or stubborn residue. This simple step contributes to a fresher and more efficient cleaning outcome for your Kenmore oven.
Operating the Self-Cleaning Cycle
To operate the self-cleaning cycle, consult your Kenmore oven manual. The process generally involves setting the cycle, understanding the door lock, and letting the oven cool completely afterward.
Setting the Self-Clean Cycle Duration (2, 3, or 4 Hours)
Your Kenmore oven’s self-clean cycle typically offers duration options, usually two, three, or four hours. Selecting the appropriate duration depends on the amount of buildup inside your oven. For light soils, a two-hour cycle may suffice, while heavier soils necessitate a longer, three- or four-hour cycle.
Refer to your Kenmore oven manual for specific guidance on choosing the correct self-clean duration. Remember that using a longer cycle than necessary wastes energy, while too short of a cycle might not thoroughly clean the oven.
After selecting the duration, ensure the oven door is securely closed to allow the automatic locking mechanism to engage. The oven will reach high temperatures, so avoid opening the door during the process.
Understanding the Door Locking Mechanism
The door locking mechanism is a critical safety feature of your Kenmore self-cleaning oven. Before the self-clean cycle can commence, the oven door must be fully closed and locked. This prevents accidental opening during the high-temperature cleaning process, which could result in burns.
When the self-clean cycle is initiated, the oven’s control system activates a motorized lock. You’ll typically hear a distinct click or whirring sound as the door locks into place. Do not attempt to force the door open while the self-clean cycle is active or while the oven is still hot.
Once the oven has cooled down sufficiently after the self-clean cycle, the locking mechanism will automatically disengage, allowing you to open the door. Be patient and allow ample cooling time to prevent any potential injuries.
Allowing the Oven to Cool Down After the Cycle
After the self-cleaning cycle completes, it is extremely important to let your Kenmore oven cool down completely before attempting to open the door. The oven reaches very high temperatures during the self-clean process, and the door will remain locked until it is safe to open.
Do not try to force the oven door open, as this could damage the locking mechanism or cause injury. The cooling process can take several hours, depending on the model and the duration of the self-clean cycle used.
Once the oven has cooled sufficiently, the door will unlock automatically. You may hear a click or whirring sound as the locking mechanism disengages. Only then should you attempt to open the door and remove any remaining ash. Patience is key to a safe and effective cleaning process.
Alternative Cleaning Methods for Kenmore Ovens
If the self-cleaning cycle isn’t your preference, Kenmore ovens can also be cleaned using alternative methods like steam-cleaning or manual cleaning with baking soda paste, as detailed below.
Steam-Cleaning Cycle Instructions
For a lighter cleaning option, many Kenmore ovens offer a steam-cleaning cycle. Begin by removing all racks and accessories from the oven’s interior. Then, wipe away any loose debris or spills to prepare the surface. Consult your specific Kenmore oven manual for the precise amount of water required, typically around one cup.
Pour the water into the designated area at the bottom of the oven. Close the oven door securely and select the steam-clean function on the control panel. The cycle duration is usually shorter than a self-clean cycle. Once completed, carefully wipe down the oven interior with a damp cloth to remove any loosened residue. This method is ideal for light cleaning and maintenance.
Manual Cleaning with Baking Soda Paste
If you prefer a more hands-on approach or want to avoid the high heat of self-cleaning, manual cleaning with baking soda paste is a great alternative. Begin by creating a paste using baking soda and a small amount of water until it forms a spreadable consistency. Coat the interior surfaces of your Kenmore oven with the paste, paying special attention to areas with baked-on grease or food residue.
Allow the paste to sit overnight, giving it ample time to loosen the grime. The next day, use a damp sponge or cloth to wipe away the baking soda paste. Rinse thoroughly with water to remove any remaining residue. For stubborn spots, a gentle scrub with a non-abrasive pad may be needed. This method is effective and environmentally friendly.

Safety Precautions During and After Self-Cleaning
Safety is paramount. Ensure proper ventilation during and after self-cleaning. Avoid using oven cleaners. Let the oven cool completely before touching interior surfaces to prevent burns.
Ventilating Your Kitchen
Proper ventilation is crucial when operating your Kenmore oven’s self-cleaning cycle. The self-cleaning process heats the oven to extremely high temperatures, which can release fumes and odors. These fumes can be irritating or even harmful, especially to individuals with respiratory sensitivities.
To ensure adequate ventilation, open windows and turn on your kitchen’s exhaust fan before starting the self-clean cycle. This will help to circulate fresh air and remove any unpleasant or potentially harmful fumes from your home. If you don’t have an exhaust fan, consider using a portable fan to improve airflow in the kitchen.
Continue ventilating your kitchen throughout the entire self-cleaning process and for a period after the cycle has completed. This allows any residual fumes to dissipate completely, ensuring a safe and comfortable environment for you and your family. Remember, prioritizing ventilation is a simple yet essential safety measure.
Avoiding Oven Cleaners
It is imperative to avoid using commercial oven cleaners in your Kenmore self-cleaning oven. These cleaners contain harsh chemicals that can damage the oven’s interior surfaces, including the enamel coating. Furthermore, the self-cleaning cycle is designed to eliminate baked-on food and grease without the need for additional cleaning agents.
Using oven cleaners can also pose safety risks. The chemicals can react with the high temperatures during the self-cleaning cycle, producing dangerous fumes. Residue from the cleaners may also remain in the oven, contaminating food cooked in the oven later.
Instead of relying on oven cleaners, utilize the self-cleaning function as intended. For minor spills, a simple wipe-down with a damp cloth is sufficient. If you prefer an alternative cleaning method, consider using a baking soda paste, as it is a gentler and safer option for maintaining your Kenmore oven.